Sunday 27 November 2011

Week 9 (part one) - Red Theme, Homework

One of the discussions we had in class this week was focussing on colours and how to use these in photography, as a result our homework was to shoot images with this in mind.  I got out and about near where I live this weekend and also had a hunt around the flat for anything Red which I decided was going to be my theme after driving past the firestation.

ISO 400F/9, S1/60

ISO 400F/9, S 1/100

ISO 400F/5.6, S 1/160

ISO 400F/9, S 1/320

ISO 400F/9, S 1/60

ISO 400F/9, S 1/80

ISO 400F/5.0, S 1/320

ISO 400F/5.6, S 1/1000

ISO 400F/5.6, S 1/40

ISO 400F/5.6, S 1/500

ISO 400F/9, S 1/500

ISO 400F/5.6, S 1/60

ISO 100F/5.6, S 1.0

ISO 100F/5.6, S 0.8

ISO 100F/4.5, S 0.6

ISO 100F/4.5, S 0.8

ISO 400F/5.6, S 1/6

ISO 100F/5.6, S 1

ISO 400F/5.6,. S 1/10

During the day and as you can see from the above settings one of the elements which completely skipped my mind whilst shooting was the ISO.  As you can see I had set the ISO to 400 and never revisted this.  I can say in all honestly I'd simply forgotten to consider this when running around looking for Red subjects. 

Becomming aware of this later in the day I did then add this to my considerations when shooting subjects back home.  I decided to shoot close up (when indoors) and added light by using a bed side lamp pointing this from different directions to see what effect it would have.  I also looked at using white balance to see how this would impact on the images, I have added a few examples below.  These were all taken using the same camera settings changing only the white balance (ISO 100, F/4.5).


Week 8 Portrait/Street photograpy

Homework from Dave this week was people (street photography or portrait).  I think street photgraphy is one of those areas that when you try to do it, it becomes a lot more difficult than when doing it by accident or simply not trying.


I ventured out into the Christmas Markets at Manchester and trying to capture people without them knowing was tricky, I did manage to get some shots but have simply deleted them as they weren't very good at all.  I think nerves and paranoia kicked in here with some gruesome looking people, shovelling burgers and hotdogs down the throats, giving me the evil eye and looking very wary.  I will simply have to try this again and next time round be a liitle bit more blunt and just ask these people if I can take their picture.


Portrait Photography, this is a lot easier than street photography only you need people who are willing to have their photo taken.  When you do find somebody willing, why do they do nothing but pull silly faces and look ridiculous!


I came accross this description below which explains portrait quite simply:


Portrait photography or portraiture is the capture by means of photography of the likeness of a person or a small group of people (a group portrait), in which the face and expression is predominant. The objective is to display the likeness, personality, and even the mood of the subject. Like other types of portraiture, the focus of the photograph is the person's face, although the entire body and the background may be included. A portrait is generally not a snapshot, but a composed image of a person in a still position. A portrait often shows a person looking directly at the camera.
Unlike many other photography styles, the subjects of portrait photography are often non-professional models. Family portraits commemorating special occasions, such as graduations or weddings, may be professionally produced or may be vernacular and are most often intended for private viewing rather than for public exhibition.
However, many portraits are created for public display ranging from fine art portraiture, to commercial portraiture such as might be used to illustrate a company's annual report, to promotional portraiture such a might be found on a book jacket showing the author of the book.


Capturing somebody's personality is one of the objective's of portrait and with not being able to get out and about to much this week I decided to shoot some images of my partner and then some more of my families children.  I find that when using children as subjects it is a lot easier to capture their personalies as they are not concerned about how they will look in a way that adults are.


So here is Dan sleeping which is soemthing that definately represents his personality and like most people must have a cup of tea before getting out of bed in the morning.  I have used aperture priority using various Fstops with an ISO of 400, I have edited these slightly using B&W and adding light/dark vignettes to create a sleepy feel to the image.


F/4.5, S 0.5sec

F/11, S 1.6sec

F/4.5, S 0.5sec

F/ 4.5, S 0.5sec

F/9, S 1sec

F/9, S 1.6sec

F/7.1, S 1/4 sec

As i said above using children as subjects seem to be a lot easier and I find the images appear to be more natural with no staging as with adults. Here is my niece and nephew playing with the family pet, again I have edited slightly by cropping, adding vignettes and using B&W.


Week 7 - Photomerge (I love you)

Panaoramic views, this is something I have tried to achieve in the past when making picture books.  As a rule I would take several shots moving the camera slightly each time and then using BLURB software and templates have spent so much time time trying to alighn images, although they have looked ok they were not seemless.

I cannot believe I was not aware of something so simple like photomerge, I have been using photoshop for years and for the life of me did not know this existed.  Thank god I do now as I love taking panoramic shots and capturing whold landscapes.

So with my new found knowledge I have put it to the test in my Mams back garden, the images are not great technically as I wasn't to concerned about camera settings at this time but really just wanted to see the results of the photomerge.  I did this a couple of times and as also used my niece and nephew by getting them move around the garden to 3 different areas to see how this would work in the final merge.


I absolutely love this feature and cannot wait to get back up to the Peak District to try this out using a more planned approach.  Using a tripod, a large aperture and a great view I could get some great panoramic shots to use towards my final set of images for my first theme.

I have also re-visited some of my old images taken before the cousre when on my travels and again this has worked beautifully.  The images below were all taken using a sony A230 in full Auto mode.


Thursday 17 November 2011

Week 6 - Long Exposure

During the class we were looking at long exposure's, using a long shutter and the BULB setting that some cameras have.  To create the light streems in the images we used torches, mobile phone lights and added gels to change the colours of the light streems.

Here are a couple of the pictures taken.


S 30 secISO200,  F 11

S 30 SecISO 200, F 11

And here are the images merged in photoshop using layers.


I really enjoyed this session and think this is something you could have a lot of fun with, i do however feel as a subject it could be quite limited!!

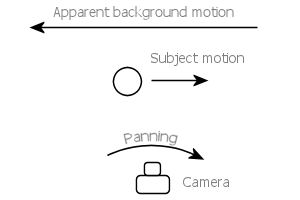
Long exposure can also be used for motion panning as explained in the hand out from Dave.  I really like this effect and by using a long exposure and moving alongside your subject, this should keep the subject in focus whilst blurring the background, I found this diagram below showing how its done.

How to make a panning shot with a motion-blurred background:
Panning diagram, top view

I had a look at some images in google to see how other people have used this technique and have added a few examples below;


I think this could be really effective when using wildlife as a subject.

Sunday 13 November 2011

Week 6 (homework)

Homework this week was "Where I Live" so I have taken some shots from my flat and have tried to be a little creative.


Candles - With winter comes the dark nights and candles where I live.  I placed a black wooden table, behind the table I have the candles on to create the dark surroundings.  I hoped that this would highlight the flames and the glass holders in the way that they look in the dark.  I have used a small aperture and manual focus for these shots to create a shallow depth of field to achieve a blurred effect in the background.


F/4ISO 200, S 1/160

F/4.5ISO 200, S 1/50

Salt & Pepper - Using the same dark background to simply capture the subject these shots also captured the shadows on the chrome. Again I have used a small aperture and manual focus here to show a narrow depth of field.


F/5.6ISO 200, S 1.0

F/ 5.6ISO 200, S 0.6

Mam's back garden - When not at home I spend a lot of time at my mams house which is my second home, not only for me but for my brothers and sisters who are always there with their children.  I decided to take a few shots of the children and have added vignettes using black and white to show the different impacts these can have.  In addition to the vignettes I have changed the shots to B&W in lighroom and altered the tones.

F/5.6ISO200, S1/200

F/5.6ISO 200, S1/250

Shutter Priority used for these two pictures as my nephew does not keep still.

 S 1/160ISO 400, F/5.6

S 1/6ISO 400, F/5.6